To start modelling your roof you first need to open the roof modelling ribbon with the button highlighted below.

In this ribbon you can find all the options for modelling flat and sloped roof types as well as obstacles on the roof.
Flat roof
To create a flat roof we use the basic mode. After selecting the basic mode choose the rectangle or polygon option and start tracing the edges of the roof to create the outline that is needed.


Connect the first and last point of your roof by pressing enter. The outline will finish and a popup will appear where you need to specify the correct height for this roof.

Sloped roof
For a roof with certain slopes we use the advanced mode. After selecting the advanced mode choose the rectangle or polygon option and start tracing the edges of the roof to create the outline. Press enter to connect the first and last point.
Unlike the basic mode you won’t get the popup to specify the height. The height of this roof will be specified by adding ridges and gutters. The gutter is the lowest part of the roof and the ridge is the higher part. Adding these to the roof will define heights and slopes for your roof.
To add ridges and gutters, select the option and draw the line crossing the boundaries of your roof. After drawing the ridge or gutter a popup will appear where you must enter the height.
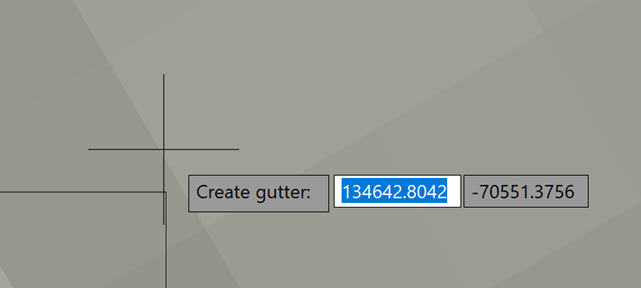
After creating ridges and gutters of different heights the slope angle will automatically be added.

The heights and slope angles can still be changed by multiple options in the “roof dimensions” section. First select which option should remain unchanged so lock the heights or the slopes.


Now to change the slope angle of a roof select “set slope” and pick a point on that sloped roof zone. Now enter the new angle and press enter.


To change the height of a ridge or gutter press the “set heights” option and select a height indicator to change. Now press enter and type in the required height.


You also have the option to display slopes in a degree value or percentage.

Roof wall
To create the outer wall of your roof we provide the “parapet” option. Select this option and then select the roof surface on which you want to create this wall. This will open a popup.

In this popup you need to fill in the desired width and height of this wall and select one of the 2 available options.
- Sloped parapet: This will follow the slopes of the roof and so you just need to enter the height starting from the roof surface.
- Straight parapet: This will create a straight wall disregarding any slopes on the roof. For this option you must enter the height from the ground up.
Obstacles
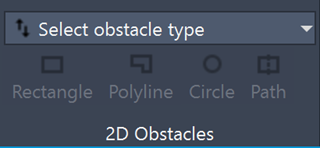
To create obstacles we navigate to the 2D obstacles section. Here you will find a dropdown list of all available 2D obstacles. To create an obstacle select an option from the list and select the shape you want to use. The options are rectangle, polyline, circle and path.

For example if firewall and the path option are selected this will open a popup where the width and height of this firewall can be specified. In this case it is set to half a meter wide and half a meter high.

Press OK, select the starting point and keep selecting points until the desired shape has been reached. Press escape to finish and the obstacle has been created.


There are also 2 options for modeled 3D obstacles. These are skylights and trees.

To create a skylight select the option, specify the first corner point and the second one to create a rectangular shape. A popup will open where you can customize this skylight. Specify the radius on both sides as well as the edge and top height and press OK to finish.


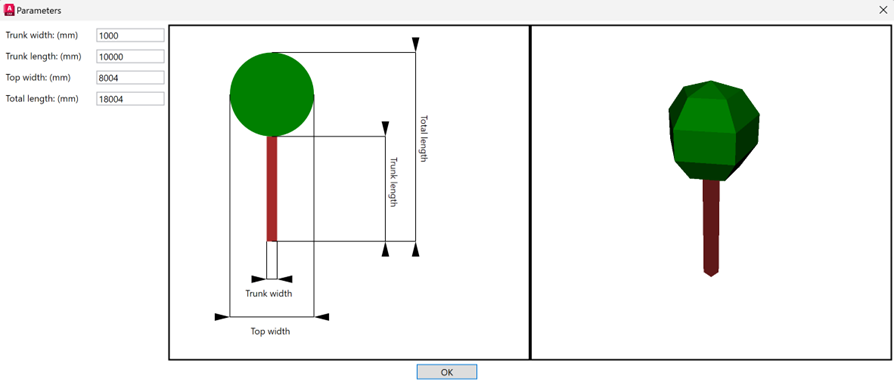
For trees you must specify the centerpoint and radius of the tree after which another popup opens. Fill in all the parameters again and press OK to finish.

Generating 3D model
After creating all the elements for your roof we can generate the 3D model. Simply select the “generate 3D model” option and it will be created.

